Playwright is one of those testing tools that just have the right amount of API to work with and its easily expressible. Hear that selenium? So we decided on using it to test our chrome extension.
As our core product at mote.com is a chrome extension we researched into how we can load one in a testing environment and write tests. We thought of trying Cypress as thats what we use for out web app but unfortunately Cypress does not support the chrome-extension:// protocol.
Playwright to the rescue
Note 1: In this example we will be testing using chromium but you can use firefox to accomplish a similar result.
Note 2: The example below is contrived and isolated in a single file but you can extract the browser config in its own file
Installation
There are a couple of dependencies we need to install before doing anything
npm init playwright <project-name>This will create a playwright.config.js (or .ts) file and a few other goodies including
@playwright/testa test runner similar tojest
Playwright.config.js (or .ts)
In this article we are not going to touch this config file apart from making sure that we write our tests in a folder that playwright is configured for. So make sure testDir in playwright.config.js(or .ts) is set to your liking
Loading a chrome extension
This article also assumes that you have an extension in the same root directory, if not feel free to adjust the path so that Playwright knows where to load the extension from.
const { test: base, chromium, webkit } = require('@playwright/test')
const path = require('path')

const extensionPath = path.join(__dirname, '../build') // make sure this is correct

const test = base.extend({
  context: async ({ browserName }, use) => {
    const browserTypes = { chromium, webkit }
    const launchOptions = {
      devtools: true,
      headless: false,
      args: [
        `--disable-extensions-except=${extensionPath}`
      ],
      viewport: {
        width: 1920,
        height: 1080
      }
    }
    const context = await browserTypes[browserName].launchPersistentContext(
      '',
      launchOptions
    )
    await use(context)
    await context.close()
  }
})
The above is all you need to load a chrome extension, setup viewport defaults, open devtools and setup which browsers to run the tests into.
What are doing above is "patching" test method of @playwright/test to load this specific config before going any further
Chrome extensions run only in
headfull modeso make sureheadless: falseis set otherwise its not going to work. Even in CI/CD you need to have that option configured like that
A dummy test
All we need to do now is write a fairly simple test boilerplate to test our config
test.describe('Popup', () => {
  test('our extension loads', async ({ page }) => {
    await page.goto(
      'chrome-extension://<extension-id>/popup.html'
    )
    await page.waitForTimeout(30000) // this is here so that it won't automatically close the browser window
  })
})
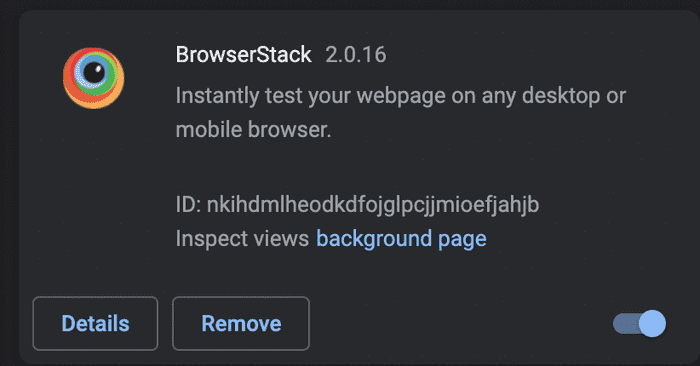
Most of the boilerplate above should be familiar if you ever wrote unit tests and should be self-explanatory. Whats important for this work is to figure out the extension id and replace <extension-id> with it.
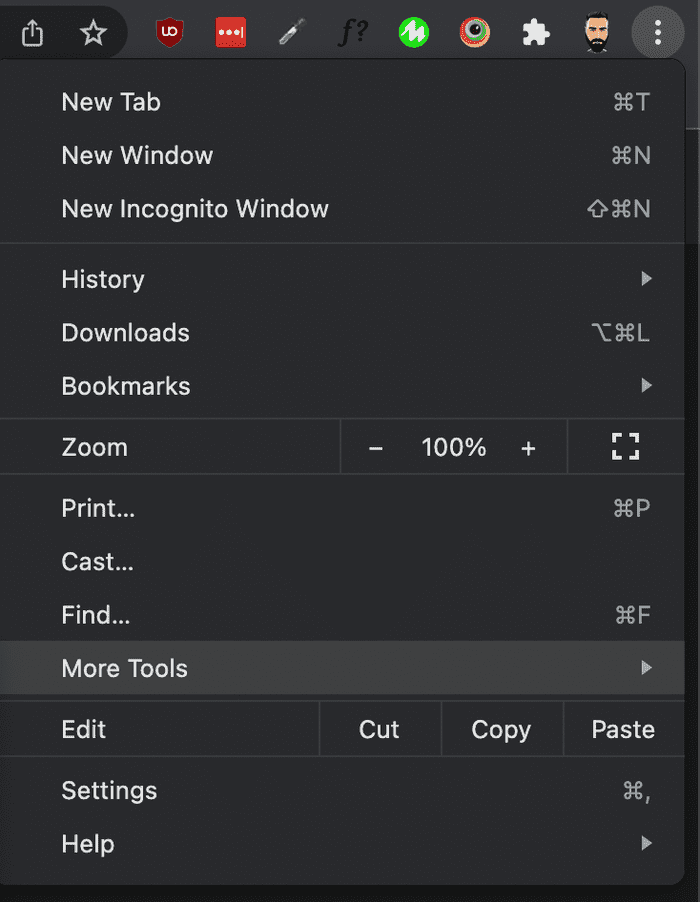
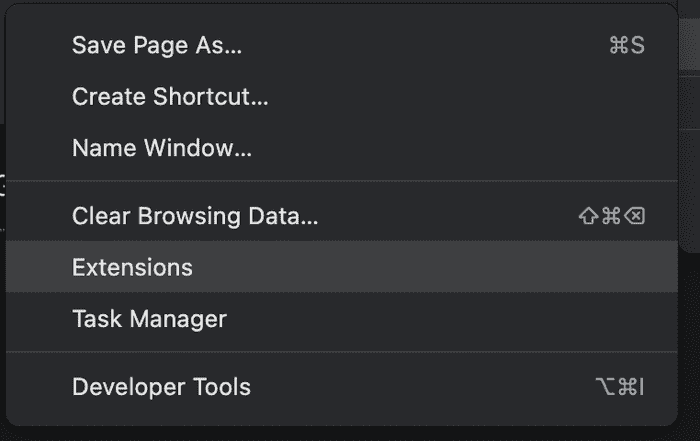
To find your extension id go to the settings in chrome -> extensions ->
 1.Open chrome menu and select
 more tools
- Click
extensions
- Enable developer mode
- Find extension id
Of course, you need to load your chrome extension in the browser first by clicking load unpacked after you enable developer mode
And that should be pretty much it, congrats! 🥳
Conclusion
We learned how easy it is to load and test a chrome extension with Playwright and if the need arises to support and publish a firefox extension we can use the same testing tool to test that environment as well.
Of course there are a ton of settings to learn about and use depending on your needs.


